The highest form of bliss is living with a certain degree of folly.

|
In this video I’m tackling a project that will drastically improve the curb appeal of my home. Today I am painting my garage doors. This is a one day project and is very simple so if it’s been on your to do list, then I hope me documenting my process helps you get the confidence and motivation. Lets get into it. Table of ContentsLet’s Repaint the Garage!
Things I Used to Upgrade my Garage Door
Step 1: Preparing the Garage Doors to Paint by Removing HardwareFirst let me give you a clear view of my set up. I have two doors and started off by clearing out everything I could in front then using my blower to get all the loose dirt and grass out of there. I don’t want it blowing on the doors when they have wet paint. Next I started removing things that I didn’t want painted….such as the keypad. On most of these you remove the battery door and there is a screw to unthread. Next I started removing the hardware. These guys are just decorative metal straps screwed on. However, after the first one I stopped because the next step is to thoroughly clean the doors and I figured if I left the hardware on, they would get a good scrub at the same time. 
Step 2: Cleaning the DoorsOk, don’t judge me for how dirty these doors are. It’s never even crossed my mind to give my garage doors a wash, but it’s been added to the regular to do list now! For this step, I used a bucket with some dawn soap in it. I recommend buying a scrub brush with a handle to make it easier. In fact, this one can connect to a hose which is pretty cool. Although I didn’t use that feature. I made sure to get the weather stripping back to white as well because that will be taking paint but paint won’t stick to anything with dirt on it. After the scrub, I followed it up with a good rinse to get all the soap off before I started taking off all the hardware. Now I had to spot clean behind the hardware when I removed it so you can make the call on if you want to leave it on or not. Be careful if you run bare hands over the holes because some have metal frayed up from punching the hole. Next I dried it off. You can use a blower or a rag, you just want a nice dry surface for tape and paint to stick to. A tip though is to raise the door up to a good working height instead of benching down low when you don’t have to. 
Step 3: Protecting the House from PaintOk, now lets protect the house. Although I hate the color of this stone, I don’t want it blue. You can pick up a roll of this awesome clingy plastic that has tape already built in on the top. This way all you have to do is unroll it and stick it where you want it. My plan is to paint the door and the weather stripping all the same color but then paint the trim a different color. I’m masking off starting around the middle of the trim so I don’t have to worry about being precise. This means I will overspray paint onto the trim then paint over it later. For now, I walk this roll all the way around until I get to the bottom. It’s very quick and easy. I cut off the excess, then unfold the drap. Know that this drap length comes in different sizes. You want at least 12” to protect your house. My store only has 18” so that’s why mine is larger. It does a great job at self sticking to things like this stone but you can always use a few pieces of masking tape as well to make sure it doesn’t blow up as you’re painting. While having the tape out I went to the bottom side of the door and masked off the bottom gasket. Again, lifting the door so I can work while standing up instead of crouching down…..I first make sure the gasket is completely dry but then I use some exterior masking tape to stick right up to the starting of the garage door. 
Step 4: Protecting the Concrete from PaintAlright we have the house, and the gasket protected, last thing to protect is the concrete. I always keep a large sheet of cardboard in my garage for situations just like this. I grabbed it, then laid it down right up to the lip of the door’s opening. If you don’t have a large sheet like this then taping a few boxes together would work as well. Or laying down another strip of the plastic wrap. Step 5: Starting to Paint the Garage DoorAnd alllll of that leads up to painting. Prep is like 90% of this job but it’s what will determine a good durable finish so don’t skimp on it. I’ll be using my Wagner Control Pro 170 to spray on my paint but know that an HVLP like the 3500 or even a roller like the ez roller would work as well. I quickly set up my gun, which is nice and simple, then placed my one gallon paint container inside a 10 gallon bucket. This is just incase I knock it over, I won’t get paint all over my driveway. Then I started spraying! I chose to go vertical as the panels on my doors have those vertical lines however whichever direction you go, you want to aim for 50% overlap. If you do that, you should only need one coat of paint. It took me less than 3 mins per side with my sprayer. If you’re interested in getting an airless then I definitely recommend checking out this Wagner 170. It features high efficiency airless technology that decreases overspray by up to 55% compared to traditional airless sprayers while delivering softer spray, improving control and providing a more-consistent finish. It’s the perfect addition for the homeowner who wants to save money by doing jobs themselves instead of hiring a contractor. A tip is right after you get done with painting, raise the door up! This way it will dry flat and if you sprayed a little heavy, the paint won’t drip.Oh, I forgot to address which kind of paint. It isn’t anything special. Any exterior latex paint will work great. 
Step 6: Painting the Garage Door TrimAfter letting that dry completely, I ripped off the plastic around the doors then started on the final painting step which was painting the trim. It’s at this stage you’ll see me go over all that blue overspray in the previous step. I applied this with a roller and the only thing to really note is I personally left my weather stripping and it’s trim piece, blue but another option is you can raise the garage door when painting the trim and paint it all to match the trim instead. ConclusionLets stand back and admire the change. Man, that stone is even more awful now haha, but doing something with that can be added to the list. I definitely love the blue more than I like the drab beige, and truly what a simple process for such a drastic change. If you have some garage doors that need a makeover then I hope this video inspires you to tackle it come the next nice weathered weekend. I’ll see you on my next project. Check out the plans listed on my website for inspiration for your next project! 

Materials I Used to Upgrade my Garage Door
via Wilker Do's https://wilkerdos.com/how-to-upgrade-your-garage-door-in-6-easy-steps/
0 Comments
Table of ContentsLet’s Build a Rotating Shelf
This rotating shelf is awesome! I love how it helps me keep my shop functional but also saves me some space. 
DIY Flip-Around Shelf Plans
$9.99
I’ve created a set of rotating shelf plans that will help you take on this build. Materials I Used On This Build
Step 1: Prepare the wood by pre-drillingLets start off with a piece of plywood. This will make up the wall that will hold the shelves and rotate around. I have a ton of walnut scraps around so that made my choice but know you can use any 3/4” stuff. Ok next is to drill some holes in what will be the top and bottom framing members. Actually there are a few parts that require a few different holes in it. I took those parts to the drill press and did them all at once. Some counterboring, some through holes. If you would like exact dimensions and specs for this unit, I have a set of plans with all the details over on my website. This is one of my favorite new things in the shop. Instead of having to clamp my bench vise down to the drill press table which is always a pain, this base has four knobs that activate or deactivate magnets. It makes adjusting parts a breeze. A tip for you: this part will end up being on about this long but I left it longer to make it easier to hold onto while drilling for the holes.
Step 2: Putting a threaded insert into the left and right parts of the shelfThese three pieces will make up an assembly but first I want to take the left and right part and put in a threaded insert, one of these here. It’s important for it to go in as straight as possible so I thread on a wheel that will later connect to it because on the top is an insert for an Allen wrench. This gives me a way to use a screw driver to start the insert and turn it. I used a speed square to keep an eye on my alignment as I started it. Once it’s grabbed a few threads into the wood, then the speed square can be tossed aside. There still came a point where my strength wasn’t enough to continue turning it so I put a washer into some pliers to finish, turning the plier handles horizontal so I can use leverage to crank it around. With that finished I can finish attaching the rest of the components including a pin that will work as a pivot point and a drawer slide. 
Step 3: Creating the sliding piece for the top of the rotating shelfOk now I repeat to make something similar for the top of the rotating shelf. This one has a few less parts but it still needs the pivot point pin, then a drawer slide attached to the backside. Now I have two crawly things that will make sense in just a few mins. For right now, I set them aside and started building a box. This is simple construction with wood glue, a predrill, and a few screws to hold things together. I started by attaching the bottom, then added the first side, then rotated it around to attach the second side. I slide it to the edge of my workbench so it won’t interfere with my drill as I’m pre drilling. 
Step 4: Making the top and attaching it to the baseFor now I’m going to leave off the top. I still need to make the top. This is that short piece I drilled holes in earlier and to make sure I got both lined up with my marks, I went ahead and ran in two screws so the point was sticking out. This way I could set them in my predrill spots and know it was lined up straight without having to measure. The center hole can get a threaded insert so that I have a way to attach this aluminum piece that will be a swing arm. I know this is looking a little crazy, but it should make sense in the next step. 
With the top made up, I can go ahead and attach it. I first stood up the piece that will hold the shelf and set it on the bottom pivot point. I precariously left it leaning on the box body while I went and grabbed the top. Now I can set this part on the top pivot point. I’m leaving off the wood glue on the part just incase I need to get back in here to make adjustments. 
At this point, I’m still not sure if it was going to work or not. So just a few pre drills and screws to set the top in place. However, instead of the final product just spinning freely in a circle, it will actually just flip like this from one side then to the other, then back again. To do that, I tilted the center shelf so that I could crawl inside slightly and attach those swing arms I made earlier. There is one I snaked my arm in to attach at the bottom, then also the same at the top. 
Step 5: Hanging the rotating shelf!Now I originally intended to hang the rotating shelf on a few studs up on my wall so that it’s at a comfortable height, but then I saw my plumb toolbox and figured I would use it to set the unit right on top of! But know that hanging it is certainly an option. Ok, now what to store on it?! The great thing about it being a bare center wall is you can custom design any shelving unit to hold whatever it is you personally want to store, whether it be shoes or towels for the house, or hardware and sandpaper for the shop! That’s what I’m going to use mine for. I used the CNCs to cut out some custom shelving that would allow me to take this big pile of mess and instead organize it. Other Thing I Used In This Rotating Shelf Build

via Wilker Do's https://wilkerdos.com/how-to-build-a-rotating-shelf-in-5-super-easy-steps/ Who doesn’t like sitting outside with a good fall breeze and some crisp air? It’s finally time to start getting ready for fall, what better way than building a good fire pit. Grab a set of plans and follow along with this video so I can show you how I made mine. Table of ContentsLet’s Build a Fire Pit

DIY Fire Table Plans
$9.99
I’ve created a set of plans to make building this fire pit super simple and easy to follow. Materials I Used for this Build
Step 1: Building the Fire Pit Frame and AssemblingThe first thing I’m going to do is build a frame from 2x4s. This will be a big box to hide the propane tank needed to feed the fire. I intentionally bought a tank that can safely be laid down on it’s side so I could keep my table lower to the ground. By the way, if you want a cut list and dimensions of this table, I have a set of plans for it over on my website. If this table is too big for you, I also have a smaller version available After using the miter saw to cut down a few 2x4s, I assembled them. I first lay out all my parts to do a dry fit. This way I can make sure it all looks right before sticking things together. Here I’m using exterior rated wood glue and a few screws on each joint. This is designed so that the top boards overlap the joints of the bottom boards. This will create strength but it also makes it quick to put together. 
Step 2: Creating the Boxes BodyNext will be to sheath it, to put plywood around the frame to create the box’s body. Since this will be outside, I’m using an exterior plywood that is treated. I also painted the outside faces which you’ll see I’m making sure to attaching pointing towards the outside of the body. This is because I plan to do a slatted design outside of this layer and wanted a dark color to be in between each slat. I’m attaching these sheets by first pre drilling then running in a screw along the bottom. Then also running in a screw to connect the top of the boards together. When going into thin wood like this 1/2” plywood, I switch over to using trim head screws like these here. Step 3: Framing out the Top and Attaching it to the BodyThe next thing I did was frame out the top side. These members will give me support to secure the top in the next step. They can be tricky to add since there is nothing except the plywood to connect them to the bottom framing so what I did was use a clamp to hold it in place once I got it lined up to the top of the ply. Again using the trim head screws to secure it. I started with the two longer pieces then connected the two shorter sides in between. Alrighty, now lets throw the top on. This is another piece of exterior rated plywood that I painted the top side of. The hole in the center will be where the fire tray gets inserted later. I lined it up to the body then secured it down by first pre drilling around the perimeter then running in some screws. All over I made sure to sink the heads of the screws so that nothing would prevent the slats that will come next, to attaching flush to the body. I’m going to leave that as is for a bit and start making the slats that will cover it. 
Step 4: Making the Slats to Cover the BodyFor this part I’m going with western red cedar 1×4 boards. This is what will take this boring box and turn it into something gorgeous to look at. I started by taking my full length boards and ripping them to width at the table saw. I made the slats half the width so two slats could come out of one board. Now I’m going to go with a water fall look so that the top boards will miter over into the side boards. To achieve this, I turned my table saw blade to a 45 and used the miter gauge to cut the boards to length. When setting up my fence, I place a clamp and a scrap board to act as a stop block. Notice how I place this far enough back on the fence so that the board will no longer be touching this scrap once it contacts the blade. If it contacts both at the same time, it creates a pitch zone which causes kickback. This is a fast way to make lots and lots of repetitive cuts. To put the miters together, I use exterior wood glue once again then also reenforce the joint with a few 23 gauge brad nails. Nice and simple. Next I repeated that same process to create a whole bunch of them. Since the pattern is the same in all four quadrants, I could prep all the parts and have them staged on my workbench. This also gave the glue time to set up. 
Step 5: Applying the Slats to the Fire Pit BodyWith that done, this next step will fly. Lets start applying the slats to the body. So the sides will have verticals that come up and meet the top slats. With that, I want the top covering the end grain of the verticals so I make sure to hold up a scrap to get the spacing correct. You can see I move it along as I work on securing that first board, but then after that the rest can get laid down with just a spacer. I also move this spacer along to make sure the slat is getting attached parallel the entire length of the board. See me using it on the top but also on the side. My spacer is just a random scrap I found to be the size needed for the gap. When I get to the inside most slat, I hold it in place so that I can go to the inside with a pencil and mark the center hole opening. I think it’s easier to cut this now with a bandsaw but know that you can also attach it and cut it after the fact with a jigsaw or even a flush trim bit in a router. The fire tray with cover it so no need to make it super pretty. 
Step 6: Creating the Propane Tank DoorI’m using a few streaks of DAP Dyna grip on each one of these before the brad nails. This is my favorite construction adhesive as it’s incredibly fast setting and works for both interior and exterior projects. You can see next I repeated much of the same process but this time with just straight vertical boards. These are butted up right to the underside of the overhanging top slat and I make sure to use the same spacer so things remain consistent. All these slats hang past the body slightly because I personally wanted casters on mine so that I can make this thing mobile when not in use. The overhanging amount will cover the added height. This big gap here will be a removable panel to allow me to access the inside propane tank. I’m using magnets here and attach them by counterboring into the framing material then screwing in a magnet. Now I can attach a washer on a screw to the door on all four corners to correspond to these magnets. Once the door is in place, I could repeat the process of attaching verticals to make it disappear into the body. 
Step 7: Applying Finish to the Fire PitLets go ahead and put a coat of finish on them to really see them pop. In order to get in all the nooks and crannies of the sides of the slats, I’m spraying on my finish but you could absolutely just roll or brush it on instead. I’m using my Wagner HVLP which makes very quick work of this step. For a finish I’m going with the Total Boat Gleam 2.0 as it dries quickly, does a great job at leveling out on it’s own, and what I most like is that it has UV resistors in it so this cedar will hold up even though it will be outside. Step 8: Adding Casters to Make the Fire Pit MobileOops, If forgot to show you when I attached the casters. But back after attaching all the slats, I tiled the box over and screwed on a few casters which is what is allowing me to rotate this thing around to show you all sides. I personally like the idea of it having casters on it because it will only be getting used during the winter months but for the summer months, I like the idea of pushing it out of the way and using this space for something else. Once I picked out where I wanted my fire table to be I started loading in the appliances to make it work. The tray slips right into the center opening and comes with pretty simple instructions on hooking it up to a propane tank. You can’t lay a normal propane tank on it’s side so if you build one of these you either need to redesign it so it can stand upright or buy one that is designed specifically to be laid over. Step 9: Finishing details! Adding Rocks, Chairs, and Drinks!Now I need to fill it with rock, grab my portable chair, and a drink and enjoy. As you can see there is plenty of space for company to join me and also plenty of space to set drinks or a plate of food on the unit itself. However remember that I have plans for this larger unit but also a more compact unit if you’re interested in building one yourself. 
ConclusionIf a fire pit has been on your to do list then I hope this video has given you some good inspiration to tackle it this fall. Be sure to check out my website for a set of plans for this build as well as several others. I’ll see you on whatever I’m building next. Additional Things I Used in the Build:
via Wilker Do's https://wilkerdos.com/how-to-build-a-fire-pit-in-9-easy-steps/ If you’re looking for a place to store your firewood that also is super cool to look at, check out this firewood holder DIY. Before, I would just have my different sizes piled up in containers around the hearth, which was really unattractive. So on a whim I threw these together. The three compartments allow me to separate small, from medium, to large pieces of wood. Grab a set of plans and let me show you how I build them. Table of ContentsLet’s Build A Firewood Holder

DIY Firewood Holder
$9.99
I’ve created a set of plans to make building this firewood holder quick and easy! Materials I Used in this Build:
Step 1: Selecting Material and Cutting to SizeI did design and build these on a whim so when selecting material, I just looked around my shop to see what I had already that would fit the sizes. I found this stack of 3/4” cut off from some shelves I tore a part that I’ll make the body from. Then for the back, I have some 1/2” plywood from who knows what. I started off by ripping the sheets down to width needed. If you want exact dimensions, I have a set of plans available over on my website. I tilted the blade over to then cut in the angles needed to created the pointed miters. Since there are a lot of repeated parts, I set up a stop block so that I could make them all the same. When you do this, you want to make sure to set the stop block back far enough so the board won’t be touching it when it contacts the blade. As this is what can cause kick back. To save from switching the blade back and forth, after cutting one side with the needed angle, I would flip the board and cut the other side since it still had a 90 on one end. This will leave the remaining board with angles on both end, that I can chop up for the mitered parts. I personally like to always do a test first and a dry fit to make sure things are going to work as I have them planned. That looks good though. 
Step 2: Banding the Edges of the Firewood HolderNow I just needed 12 of them total so I locked in the new distance for the fence for this part and chopped up the remaining bit into pieces. This project only consist of four different parts. What I’ll call the side, the tops which are slightly longer than anything else, the horizontal shelves, then the mitered points. Keep in mind that it would be simple to add more to subtract the number of cubbies, depending on your spaces needs. Alrighty, now I’ll edge band the edges that will be facing the front. Actually, on second thought, I like the idea of painting them instead. Note: that if you edge band you’ll need to do that before joining the parts together, but if you want to paint, then you can go straight into assembling. 
Step 3: Assembling the Firewood Holder CubiclesFor assembling, I started off on top of my workbench and what I did is apply some wood glue, I’m using DAPs weldwood here, to every joint, then pin nailed things together using my 23 gauge nailer. This is a pretty weak joint until the wood glue has time to set up, so I was being careful as I was moving it around to attach the next leg. If I didn’t have a 23 gauge, I would have used a 18 gauge instead. After getting a few attached, I thought it would make things easier to do it on the ground so I could see everything clearly as I was attaching legs. So I moved it down to the floor and continued. I would juke and jive to create the points of the cubbies, then attach the horizontal that will create the separation between. I paused when I got to the very top because the way I have it designed, the top edge will actually be seen. With that, I edge banded both of these parts before adding them on. This is as simple as heating up an iron and warming up the glue on the back of the banding until it sticks to the plywood edge. This will be slightly different than the ply, but it doesn’t bother me. 
Step 4: Painting the Firewood Holder CubbiesI left that where it sat to give that glue time to set up and dry. While it was, I grabbed pieces that will make up the back from my 1/2” plywood scraps. I also grabbed the pieces that will make up the sides. I want both of these to be painted the same color as my wall which means I need to give them a few coats before attaching the cubbies. Since I have the paint out, I also wanted to paint that front edge of the cubbies. I first give them both a good sanding to get them smooth. Now when working with plywood, there are typically voids on every single edge. In order to get a smooth looking paint surface, I apply some wood filler on a putty knife. I’m using DAP Premium wood filler. This stuff not only dries fast but is easy to sand and is great to color match if you are staining something. After letting it dry for about 30 mins, I came back with a sanding sponge to knock it down flat so that I could roll on the paint onto the pieces of the firewood holder. With finishing out of the way, let me just push this button here to raise my finishing shelf up and locate the hardware I’ll need to attach the cubbies to the back. Step 5: Shaping the Back to Fit the Firewood Holder CubbiesI started with a back slightly larger than what I needed, then plopped the cubbies down onto it and lined it up so that the bottom cubby was flush to the end of the plywood. I used my pin nailer to just tack things in place to start. The end is easy as it should be flush, but to make sure the rest weren’t crocked, I pulled a tape to get the spacing perfect before tacking the rest. With it not able to fall off now, I tilted the entire unit on it’s face so that I would have access to the underside to throw in screws. Here, I made sure to pre drill to prevent splitting. 
Step 6: Securing the Firewood Holder Cubbies to the BackThe top location is easy to locate because you have a visual on where the shelf is located. However, the second one is tricky because it’s in the middle of nowhere. What I do is grab a speed square, this Crescent one has an additional 6” flip out rule so that I can position it in the center of the shelf, go down to the dimension needed, and pre drill. If you don’t have this speed square or another long one, then a level would also do the trick. For the angled portion of the shelves, the speed square wouldn’t work, so I grabbed a scrap and cut in an angle at the tip. This way I could rest it on the shelf and allow me to mark the height. Making sure to keep it in the same location, I moved the scrap to the face closest to me to now drop it down back to the line I made which gives me the location of the angled shelf to pre drill and attach a screw. With the back on, this thing now feels really secure and strong. I flipped it up to take a look. I actually think it looks pretty good with a square back on it and was considering leaving it as is but then I decided to stick to my original plan and make the back flush to the geometric shape. I wasn’t able to locate my palm router, which is actually the ideal tool to trim the back off, so instead I put a flush trim bit in my router table and trim it off that way. The key here is to keep the unit nice and flush on the table as you move it along. I laid the unit over and attached the side. This will help support the horizontal shelves that will actually be supporting the load of the firewood. 
Step 7 : Installing the Firewood Holder and Cutting FirewoodLast thing to do was install them. Now I personally wanted mine up off the ground so I wouldn’t block an outlet I have over on the right hand side. Then I also like to use this area for storing my games and puzzles. With that, I propped the units up, found the studs, then drove a few screws into the back of the unit to attach them. Ok lets load it down and see how much it can hold. Now that, is much better than before. Instead of ugly boxes and totes, I now have a nice firewood holder with dedicated space for the wood. This will allow me room to store and separate all different sizes of firewood during winter. Then I personally like the look of wood enough to keep it full year round, but I could also store other kinds of nicknacks during spring and summer should I want to. What do y’all think about them? Remember how easy it is to make larger or smaller. I even think they would look good horizontal, depending on your space. I have a set of plans for this project as well as many other over on my website. In fact, if you want firewood storage ideas, I have a few of them. I’ll see you next time. Material I Used For This Build:
via Wilker Do's https://wilkerdos.com/how-to-build-a-firewood-holder-in-7-quick-easy-steps/ The shingles, windows, solar panel, and the insulation were all designed by 3M to help create solutions for the most pressing climate challenges that impact people’s lives. I’m utilizing these materials on a doghouse to show you where technology is advancing to, but imagine if every new construction site were also using them and we started making our buildings work in better balance of nature. Table of Contents

Modern Dog HouseMaterials I Used to Build The Dog House
Step 1: Laying out parts and pre-drillingThere are four main components to build: The deck, the front, the back, and the roof. I started off by grabbing all the parts that will make up the deck and laid them out on my workbench so that I could predrill and attach things together with screws. I do have a set of plans for this project if you would like a material list and a cultist to build your own. Next I laid out all the flooring material to attach it to the topside of this framing. I was shocked that the price was a 1/3rd of the cost and I just made sure to put the ugly side down! You’ll want to make sure the frame is square before attaching the decking. I used an 18 gauge nailer to quickly attach things. 
Step 2: Attaching the pieces to make up the front of the dog houseOk, first big component down. Now lets set that aside and pull in the pieces that will make up the front. I cut all the parts according to my cut list then did a dry fit first just to make sure there weren’t any obvious problems. Once everything was laid out and things seemed to work, I started attaching things. As you can see I’ve pre-painted mine and that’s because of the color scheme I wanted in the end, it’s much easier to paint the framing beforehand. After getting done, I set it aside and repeated those same steps to frame up what will be the back wall, then set it with the others. 
Step 3: Making the dog house roofThe last major component to build is the roof. If you use my plans to build this dog house, I would recommend keeping the pieces separated like this so it makes building time go much quicker. At each stage, I was able to bring in the needed parts for that assembly then quickly arrange them, and screw them together. If you notice me skipping the wood glue it’s because it doesn’t stick very well to painted parts. If you have raw parts, then you could use some on each joint, just make sure it’s exterior. After knocking out the framing for the roof, I applied this tonge and groove material on top. You could absolutely use some sheet material like OSB or Plywood, but I wanted the inside of the roof to match the siding I will add later. Tonge and groove is awesome because it goes together so nicely and connects with the previous board. I’m once again using my 18 gauge nailer here to pin it to the framing. I started on one end, then worked my way down to the other. When I got to the end, I held the board in place, making sure the tonge and groove were facing the correct direction, made a mark on the underside, then cut this board to the needed depth to fill in the remaining space. 
Step 4: Attaching all of the assemblies togetherAlrighty, now lets play shuffle and start throwing all the main components together. I’ll set the roof over here, move the front and back, so that I can grab the deck and set it on the workbench again. Now I’ll grab the back to start and if done correctly, it should just slip right onto the deck. I predrilled and threw in a few screws to attach it. Then repeated with the front. Since this dog house is a little bougie, there is a porch so the front is set back a ways to create said porch. Now lets throw the roof on. I found it easiest to climb up on my workbench to do this, but building it on the ground could also work. The framing of the front and back walls have ‘ears’ on them to help locate the roof, but it might need some help to seat the roof all the way down since it’s a tight fit. Something that helped is backing out the top screw in the framing to allow that ‘ear’ to flex out slightly. Once the roof was seated all the way, I could tighten back up on the framing but also attach the framing to the roof to secure it down. 
Step 5: Installing the siding of the dog house to close the wallsNext up is siding! This is made up of that same tonge and groove material I made for the roof and it’s just as simple to throw on vertical as it is horizontal. Once cut to length, you just need to make sure the board going on is seated all the way down on the previous board. Again, I’m using my nailer to attach things. Nice and simple. When I get closer to the top, I use my bandsaw to cut in the angles needed. RT audio I’m calling that good. I did the same exact process on the other side. 
Step 6: Completing the front and back walls of the dog houseLet’s complete the front and back walls. I’m sure you were wondering why there are so many empty cavities designed in. It’s because I wanted the dog house to have class paneling. I don’t know about your pups, but mine like to be able to see what’s happening in their domain. Instead of one large panel, which you can very well do if you want to simplify things, I decided to break up the space into multiple small ones. This is where our first 3M science product comes in. Not the glass…..but the film applied to the glass. A fun fact: visible light is light you can see and infrared light is what you can feel. 3Ms Sun Control Window Film Prestige Series reflect the suns infrared light significantly reducing the hat coming through windows. In addition to that, they also reject up to 99.9% of damaging UV rays. These films are designed to be applied directly to your existing windows to provide an easy and cost effective upgrade vs replacement. It allows my pups the openness windows provide without letting the heat and UVs in. If you can’t tell, I am loving this thing. 
Step 7: Building the Roof of the Dog HouseOk moving on to the roof! Before adding shingles, I went around the edges and added metal drip edge. What I do to install this is I hold it up on the edge, starting with the short side first, then cut it where the corners land. You’ll want to use roofing nails to attach it down. Since one piece won’t wrap all the way around, I let the leftover amount hangout, then used a new piece to finish covering the remaining side. Using a roofing nail to tack through both. With that down it was a simple matter of nailing down the shingles. I figured out the overhang on the left then let the right run wild. I’ll cut it later. The shingles have a yellow zone to use the nails on. While I work my way from the eve to the peak, let me tell you the awesome science of these shingles. 3M is making smog pollutant reducing granules (the tiny particles that make up the shingles) that might sound like a mouth full but it’s fascinating. These granules will absorb and hold onto nitrogen oxide in the air that touches it. Then it will turn it into water soluble ions that not only safely wash away with the rain but then carry the nitrogen to the ground below which helps plants and grass. To put it simply, these granules, the shingles turn a roof into a smog fighting surface where it will take nitrogen from a place we don’t want it, and carry it safely to a place we do. And that my friends, is how you can build your dogs a bougie house, very simple and easy but so stylish. Also remember I have a set of plans available if you want to build your own. 
Step 8: Showing off some 3M productsI’m going to go ahead and add more accessories in order to show you two more really cool products 3M has initiated and released to do their part in changing the world. First up is a dog bed. 3M innovated a 100% recycled featherless insulation called Thinsulate. I’m using it as the stuffing material in a dog bed (I just bought one then replaced the stuffing inside with insulation) However, it’s everyday application is actually within performance apparel and outerwear. It’s made from 100% recycled content such as plastic bottles that end up in the landield, meaning it’s helping to address global waste. It’s lightweight as natural down and still performs when wet. Then the last thing to show off is called the Midsummer solar roof panel where 3M’s Ultra Barrier Solar film is incorporated. Due to low material consumption, a unique manufacturing process and production, Midsummer’s solar roofs have a 90% lower carbon footprint compared to traditional solar panels. I’m so proud to be partnering with a company like 3M who isn’t only concerned with their bottom dollar but are setting goals for themselves to be carbon neutral and then investing time, money, and research to innovate products to accomplish it. Every new 3M product has a sustainability value commitment that shows how it contributes to the greater good. The four products in this dog house are just an example I really hope you enjoyed this project. Check out my website for a set of plans not only for this Things I Used in this Build:
via Wilker Do's https://wilkerdos.com/how-to-build-a-dog-house-in-8-easy-steps/ Table of Contents

Compost Bin PlansMaterial I Used to Build The Compost Bins:
Step 1: Building the posts for the Compost BinsI have a set of plans for this larger size I made myself but I also have a set of plans that is smaller. Since I live on land and have a huge garden, I wanted the extra capacity. I’m placing this right outside my garden, next to a potting shed I built a few years ago. I’m going to skip digging holes because that’s standard practice but know there are 8 needed for this build and a 4×4 can be placed in each one. The back posts are simply cut to size, then plopped in their spot. The front ones, have a center channel that runs most of the way down. These are what make the front slats adjustable. To cut these in, I go to the table saw. A trick to cutting in the channel easily is to set up two fences. I make my first pass by using the table saw fence which is set up to establish the far right boundary of the channel. On my second pass, I use a scrap straight board that is aligned to the left of the needed channel. Another scrap is placed on the outfeed table to establish the depth of the channel. When it comes time to run the third pass, I don’t use either fence, but instead float my 4×4 in between the two to clear out as much of the center as I can. Don’t worry if you don’t get it all though, a chisel can do the rest of the clean up work. Typically when working with a chisel, you want to use the big flat portion to move along the wood. However, in situations like these where the handle prevents you from getting down flat, know you can flip it over and use this small bevel instead. It’s a smaller surface area so it’s harder to keep flat, but just place a finger or two down on it to help. 
Step 2: Preparing the Posts to be Placed in the GroundOk, with the channels made, lets put these posts in their place in the front line up. With posts going in the ground, make sure you’re using pressure treated wood. In fact, I recommend using Prowood which even has labeling to help you pick out the correct treated material for your specific project. For my posts, I made sure to find the label that said “ground contact”. One of my favorite things about Prowood is they use the latest advancement in pressure treated lumber to color treat their wood! So instead of the standard green tone, you can now choose from a variety of colors and skip the staining step. The wood is color infused so pigment is driven deep into the wood fibers that’s warrantied to stand up to the elements for years Step 3: Placing the Posts in the GroundLet’s move on to setting these posts in the ground. I didn’t feel like messing with concrete so for this project I used decomposed granite as an alternative. This stuff can be found bagged in the garden section. On every post, I fill the hole up about 1/3 of the way, then I tamp it down, aka compact it. To get it started I prefer to use a short scrap and I chose a 1x so I can fit into the tight spots around the posts. I’m going for enough compaction to keep the post from leaning a ton so that I have both hands to place a level on one side of the post and push it into plumb. Once I have it there, I compress more, then repeat on the other face of the same post. After getting it just right, I fill up the hole further then really try my best to compact it tight. I have a rock bar, because everybody in the hill country does, and it actually comes with a 2” round tamp on one end, so that’s what I use. I recommend you start with an end, then hop down the line to set the other end post, then knock out the in betweens. More than making sure each post is plumb on two faces, you also want to make sure the faces are square to one another, I’m using that long 1×4 to test this. 
Step 4: Leveling the PostsNext I made all the compost bin posts level to each other. To do this, I found the height of the shortest post, then cut the top off the others posts to match it. I did this with two passes using a circular saw. This is faaaaar easier than trying to get all 8 holes exactly to the same depth. While I was cutting, I cut in a shoulder on all four of the back posts. Be watchful because if you move around a post as much as I did here, you’lI absolutely have to replumb it. A good tip is to don’t be too worry about perfectly plumb until now, just get it close, because the next step is to add a 2×4 that reaches across all four of these back posts to secure them together. At this point I made sure the posts were perfectly plumb then I could tamp away and compact it as much as I could. 
Step 5: Adding Screening to the Compost BinGo ahead and take your time on setting these posts because if they are plumb and square, then it will make everything else from here fly. The next step is to dress off the back of the compost bin. There are a few options you could go with for screening but I recommend hardware cloth. I’m using a crown stapler to pin it into place, trying to work out the bubbles as I go. I pin it in just a few places to hold it down, then once I don’t have to hold it any longer, I go back and thoroughly attach it. I imagine there will be a decent amount of pressure once these compost bins are full. To cut hardware cloth you can absolutely use a pair of side cutters but a much faster way is to use a right angle grinder with a cut off wheel. Don’t worry if you get into the wood a bit. 
Step 6: Cutting Railings for the Compost BinAt this point I go back to my shop and cut some rails that will span from the back posts to the front ones. I use my bandsaw to cut in two different shapes on one end of these pieces. The T’s will be placed in the center, while the Ls will be placed on the outside. On all of these, I start by attaching the back of the rail to the back post. When I move to attach the front, I move the rail in or out with my knee. Things should be plumb at this point, but each one was slightly off. No problem though, After pinning it in front, I could once again tamp down the granite. 
Step 7: Hardware Cloth for the Compost StallsWith these rails in place you can see the shape of each stall appearing. To complete it, I wall it in using hardware cloth on all the inside faces. These are roughly cut to size first to make handling them a little bit easier, but once I start pinning them, I let them run long on the front because it’s easy to trim perfectly to length after. In fact, if you have a buddy around, have them grab a pair of square nose pliers and pull the hardware cloth tight while you secure it. This is most useful on the front home stretch. Note: that this air gap in between each stall is intentional. Airflow is a big contributor to a healthy compost pile that won’t stink. If you do compost right, which includes air flow annnd a balance of brown and green layers, then odor shouldn’t be an issue.
Step 8: Walling off the Front of the Compost BinAlright, lets wall off the front. To keep the bottom slat from resting on the ground, I ran in a screw to interfere with the track on the 4x4s. This means, I can now feed in slats as tall or as low as I want for each stall. I’ll probably leave them all high while filling and letting the compost cook, but it will be very useful to take off slats as I’m removing the compost for use. Note: treated wood vs. non-treated woodif you’re worried about using treated wood around compost know that the main ingredient in Prowood pressure treated lumber is actually copper, which is used in frying pans and even water lines. The technical name is Micronized Copper azole which still makes the wood termite and fungal resistant but means you can use it on food prep surfaces. It also means other benefits like it’s more natural looking, less corrosive to fasteners, and color treated boards will outlast cedar and redwood boards, hands down. 
Step 9: Protecting the Compost Bin by Adding LidsOk one last component and this compost bin project will be a wrap, in order to keep animals out, next I built some lids. These are pretty simple construction with some 2x2s and more hardware cloth. I built these inside my shop because it’s way easier to do on a large surface than on the ground. I started by attaching the cloth to one of the 2x2s, then flipped it over and attached the long side to this short side. Then just repeated on the remaining two sides. Again, going for air flow but a no critter zone. To attach them to the compost bin, I started by screwing on a few hinges to the back of the body. Then I set the lid in place, lined it up to this hinge then secured it with screws. Regardless on how long you have the front wall, this lid will close down but lets go ahead and install all the slats and take a look. You can absolutely leave it as is but I installed a simple string attachment with a small weight in order to make lowering the doors a little easier. And you’re done! You’ve built your own compost bin! 
I am just now getting into composting so I know I don’t know much, but I think this three section compost bin rock! There are three bays because there are three stages of composting. I’ll always have one that I’m filling, one that is in the cooking stage, then one that will be ready to use compost. It will be close to two years before I have this third ready to use but once I invest the time, I should always have a stall rotating into use. The front wall is super easy to lower, or raise depending on the task that’s needed, the lids will keep animals out but lets in moisture and airflow, and unlike compost methods that require tumbling, I’ll be able to layer up green and brown things to let sit until ready. It’s a super low maintenance compost bin. ****Remember I have a set of compost bin plans if you would like to build your own. I have this set which is large, but also the same design on a smaller scale. You can also go to prowoodlumber.com and find out where to buy Prowood for your next build. **** I’ll see you on my next project! Additional Things I Used in this Build
via Wilker Do's https://wilkerdos.com/how-to-build-a-compost-bin-in-9-easy-steps/ Have you ever wanted to give your food that smoky flavor but don’t want to deal with the hassle of a huge smoker? I recently discovered cold smoking food and I’m obsessed! Cold smokers can be made out of anything since they don’t have high heat or a flame. Let’s make one! Table of Contents

DIY Cold Smoker
$9.99
Materials I Used to Build This Cold Smoker:
Step 1: Preparing Materials for the BuildFirst know that I have a set of plans for this one plus a larger unit if you’re interested in building your own. The smaller one you’ll see me build has four racks but the larger unit has more. I have so much scrap wood piled up in my shop that I pulled from it instead of buying anything new. To start, I went to the table saw and ripped down some material to make up the legs. Regardless if you use scrap or buy new, just don’t use anything that’s treated since this will be around food. I made two sets of legs by using a cross piece to join two legs to each other. On all these joints, I pre drilled first to prevent splitting. Next I laid out marks for where I wanted my shelves on the inside of the legs. These will be what my racks rest on. I went to my scrap bin to find something suitable then chopped them to size before attaching. To attached, I used a little bit of Daps Weldwood wood glue then my 18 gauge brad nailer. I repeated on the other set of legs. I set both assemblies next to each other so I could just make sure the racks lined up with one another. Next is to flip the assemblies 180 but it’s important to keep them situated so that the racks stay aligned to one another. Now I’ll sheath this side, which will be the outside. 
Step 2: Sheathing and Creating the Leg AssembliesNow the sheathing can be made from a lot of things but since you don’t want gaps, I used a thin tongue and groove pine paneling that I’ve actually had left over from a project I did back in 2013. The tongue and groove feature will allow each piece to connect seamlessly to the next board. Since I have a lot of the same length needed in this next step, I set up a stop block at the miter saw, then made sure to hold the length of board in between this stop and the blade, as this is the point that could kick back, then chopped the needed number of parts. I took these over to my workbench with my leg assemblies and started attaching them. Again, I’m using a bit of wood glue on each one then throwing in some brads to hold it while it dries. I made sure to keep the orientation of the legs because they aren’t identical, they need to mirror each other but as you can see, it goes nice and quick. After getting the second side skinned I joined them to each other with some cross members at the top. Again, pre drilling and driving in screws. 
Step 3: Attaching a Bottom and Making the Back of the Cold SmokerTo attach a bottom, I stood the unit up and grabbed some more cedar scrap since it’s 3/4” thick. I didn’t bother nailing them in as I’m thinking these might need to get replaced in the future. Next I laid it back down and started making a back. This is also made from that tongue and groove paneling and I just laid the boards out starting from one side and work my way over, then cut the last piece to fit. Once I liked the fit, I flipped it over so that I could attach some horizontal pieces that will keep all these back boards held together. Again using wood glue and brad nails here. Now I could flip it over and secure it in place. To do this, I placed one screw at the top and one at the bottom. 
Step 4: Making a Door for the Cold SmokerOooook, now lets flip it 180 and repeat almost all the same steps to make a door for the front. The one draw back to this paneling is how thin it is. Actually I like how thin it is because that means it’s light weight, but since a hinge needs meat to attach the door to the body, I built up it’s thickness by grabbing more cedar boards, mitering the ends, and creating a border that I then glued and nailed onto the front side of the paneling. I flipped the door on it’s face to put the brads in from the backside so you won’t see the holes from the front. Perfect, and now I have a door. To attach it, I grabbed two hinges and placed them near the top and bottom, making sure to pre drill to prevent splitting. 
Step 5: Building a Roof for the Cold SmokerAlrighty, that works just as it should. I’ll worry about a handle and keeping it shut in a few steps. For now, I’m going to build out the roof. The roof is made a little uniquely as it’s important to have adjustable vent holes at the top of the unit. In order to do this easily, I attached one board of cedar with screws, but then grabbed one piece of that thin paneling for the next board. This I brad nailed in place. Then followed it up with another cedar board to finish. Screwing this one down as well. Ok next, I cut another piece of paneling to the same size as the center board, held it in place, then used a forstner bit to drill two vent holes through both boards at the same time. This will mean the holes line up perfectly with one another when the boards are in line. However, if I want to close off or even partial open or close off the vents, then I just have to slide the top board one way or the other. Cool. 
Step 6: Putting Vent Holes into the Side of the Cold SmokerOk great, now lets work on the side vent holes. Now remember I’ve just learned about this cold smoking thing so I’m not sure if there are better placement for the holes or not, but I put some up top and some down low. I wanted to utilized some of the paneling cut offs so I made two short pieces for the top. I glued and nailed these in place with my 23 gauge pin nailer. Then I held in place a full width panel then another a bottom rail, if you will. The idea is the full width panel will slide so I connected the tongue and groove feature to the top rails already in place but then pulled it down just slightly to create some room. I glue and nailed on the bottom rail. I took some measurements and made some marks so that I could drill my two vent holes, again going through both layers at the same time. Now if all is done right, I’ll be able to open or close the vents by simply sliding this outer most board. Of course that one I pick to show on camera is the hard one. Ha. This center board has a slight bow to it which make it stick slightly, but it’s still easy enough. Here look at the others….see easy. : ) 
Step 7: Adding Finishing TouchesOk, now just some finishing touches to the cold smoker! On the outside of the door, I put a handle. Then on the inside, I applied a strip of some foam gasket stuff. My thinking here is to seal the door way off better. I honestly don’t know if it matters because it isn’t like you’re going for 100% airtight here, but I figured it couldn’t hurt. It’s a simple peel and stick process. Then once that was in place, I worked on a latch. I utilized a clamp lightly applying pressure on the door to get the placement of this latch correctly. This way, when it’s latched shut, the door will be just slightly compressing that foam gasket. Yay!!! Lets knock out a finish. I need something food safe for the inside and my go to is this Wood Honey by Total Boat. This finish is not only easy to apply, as you can see I’m just wiping it on, but it’s good for anything that will be around food such as bowls or countertops. Then for the outside of the cold smoker I’m going with Total Boat’s Halcyon. This is another one that is really easy to apply, I chose to use a foam brush, but it also dries to a UV stable gloss or stain finish. I recommend five coats of this but don’t worry, it dries so fast, you can easily apply them in a single day 
Testing out the Cold Smoker!Ok ok ok, lets try it out! Ok so the concept is you place a tube with smoke pellets down here. I went ahead and laid down a piece of steel just in case an ember falls out of the tube. You light up one end….not to where it has a flame, but is just smoldering. This apparently will go for hours and you can buy pellets in all different flavors like hickory, pecan, apple, and mesquite. I made the sizing of my unit fit cooking racks so that I can place whatever I want to smoke, on top and slide them in. I also bought a thermometer so I can stay in touch with how cool or hot the smoker is. For cheese, it needs to be kept around 80-85 degrees. I’ll tell you right now, this is a blast. The olives and okra only take about 20 mins and the cheese takes 2 hours. It smells great, tastes good, and is a very quick and easy build. I hope you enjoyed following along and remember if you want to build your own cold smoker, I do have a set of plans for a few different sizes. Things I used to Build the Cold Smoker
via Wilker Do's https://wilkerdos.com/how-to-build-a-cold-smoker-in-7-easy-steps/ How to remove wallpaper 3 different ways and testing the best method to strip wallpaper quickly and easily. 
Maybe I’m just a glutton for punishment, but I hardcore nerded out over a wallpaper removal experiment yesterday. If I have to fight some wallpaper, I like to know that my arsenal of DIY supplies is fully equipped to handle the job, right? So I took one for the team to find out the easiest, best way to remove wallpaper. 
It’s hard to believe it’s already been 5 years since my mom and I put up this pasted wallpaper in Olivia’s room, and now here I am preparing for her “preteen” bedroom. What?! How?! Finding the Best Way to Remove WallpaperFor this experiment, I tested 3 different wallpaper stripping methods to find which one worked the best:
*I didn’t use a wallpaper steamer because I wanted this to be straightforward without the need for any specialty tools, but buying or renting a steamer does help if you have very old, stubborn wallpaper that likely wasn’t installed correctly. 
How to Remove WallpaperSupplies
Step 1 – Protect FloorsLay down a protective drop cloth as wallpaper removal does get messy, and you will end up with pasty water all over your floor. Secure drop cloths with painters tape. 
Step 2 – Remove Electrical Covers & Cut PowerYou have to remove switch plates and electrical outlet covers to pull wallpaper away from behind the plates, but since this is a wet job, you definitely want to protect any electrical from water exposure. Cut the power and cover switches and outlets with painters tape until you’re ready to work around them. 
Step 3 – ScoreWith the scoring tool, score the entire wall in a circular motion with light pressure. Don’t press too hard or you could puncture through the drywall. The scoring tool perforates the top layer of the wallpaper so that the wallpaper remover solution can penetrate and reactivate the adhesive. 

3 Ways to Strip WallpaperAfter all of the prep work was done, I tested the 3 wallpaper stripping methods, starting with the store bought Piranha brand. There are other brands out there that are probably just as effective. This is just what I randomly grabbed on my trip to Lowe’s. However, before trying ANY wallpaper solution, use a putty knife to pull up the wallpaper at a corner or seam to see if you can peel the wallpaper away without damaging the wall or without the need for any liquids or steam. You just might get lucky and it will peel right off (then go buy a lottery ticket because the odds of easy removal are slim). 
Store Bought Wallpaper StripperWork in sections. I like to remove 2 wallpaper panels at a time. I followed the manufacturer’s directions spraying the Piranha wallpaper remover all over 2 wallpaper panels until fully saturated and waited 15 minutes for the adhesive to activate. 
Use a putty knife to loosen any corners or edges and pull away the wallpaper. I have to admit this wallpaper stripper worked incredibly well! I had two panels completely removed with barely a fight at all in 4 minutes and 38 seconds. I didn’t have to reapply it since it had a long open window that kept the adhesive wet. If you have stubborn wallpaper, it might only remove the top layer, and you’ll need to repeat the solution application process to remove the second paper layer. Piranha Brand Wallpaper Stripper Pros:
Cons:

DIY Vinegar Wallpaper StripperYou can make your own DIY wallpaper stripper using just white vinegar and hot water! On the plus side, it’s super inexpensive and eco-friendly. Recipe
Fill a spray bottle with 1/3 white vinegar and 2/3 hot water. I used an electric kettle to add hot water because the hotter the better to activate the wallpaper glue. It’s a good idea to only do a small section of the removal process at a time so that your water doesn’t get too cold. Keep mixing every few panels with hot water. Activation Time: 2 Minutes 
I sprayed two wallpaper panels with the DIY vinegar wallpaper remover solution and waited for 2 minutes so the adhesive could activate. Be aware, that you’ll probably need to mix new vinegar solution in the spray bottle frequently as you want to keep the water hot for optimal effectiveness. 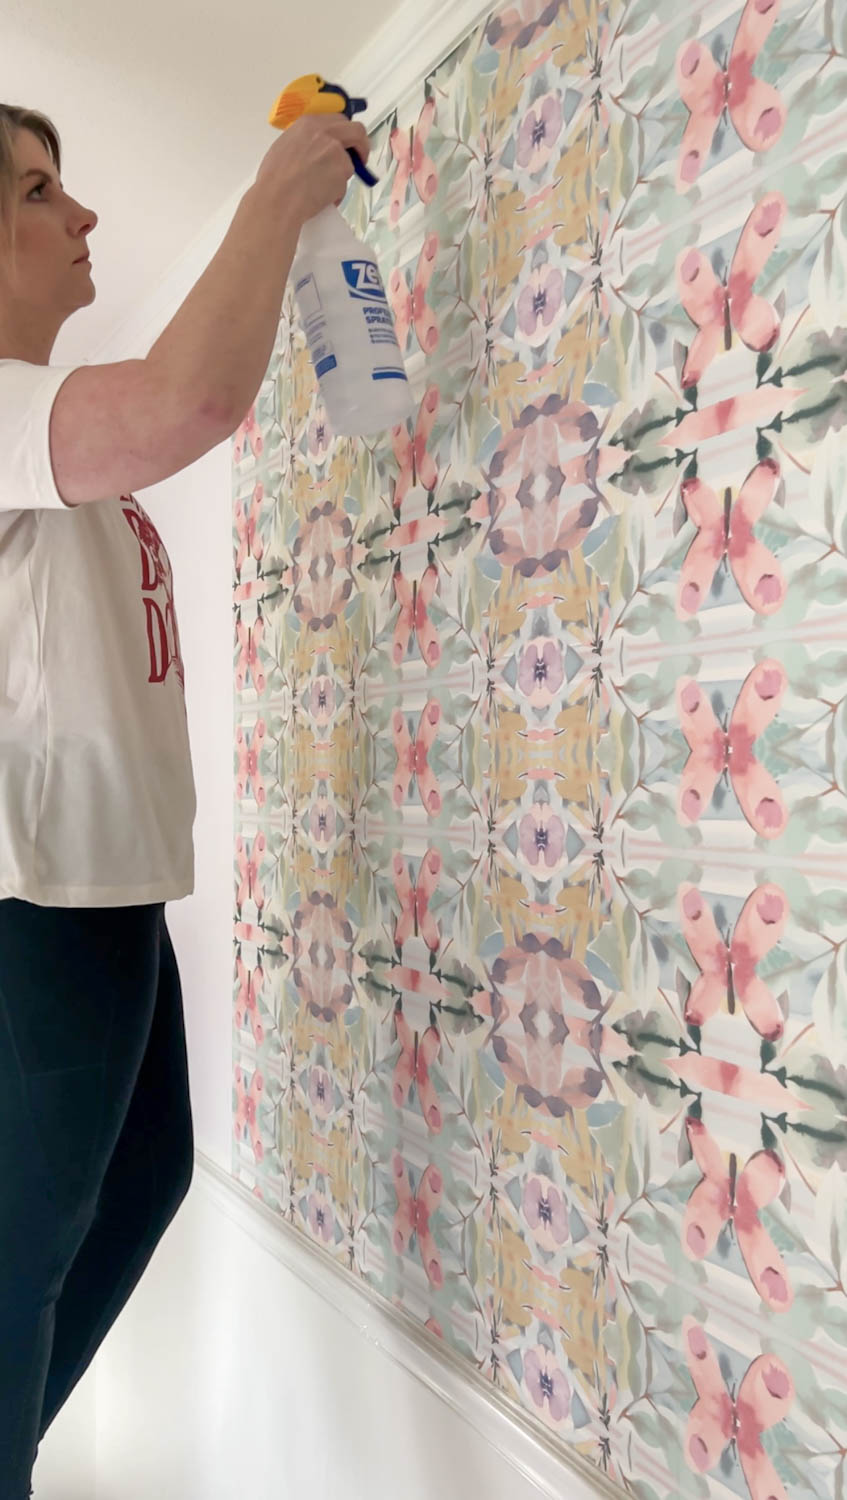
This method did work, but it definitely took some extra effort on my part to yank the paper away from the wall. It ripped, came off in tiny shreds, and it was by far the least effective of the 3 methods I tried. Still, it’s very inexpensive to make and non-toxic, so that’s a perk. DIY Vinegar Wallpaper Stripper Pros:
Cons:

DIY Fabric Softener Wallpaper StripperYou can make your own DIY wallpaper stripper using just fabric softener and hot water. It’s very inexpensive to make and (bonus points) it smells amazing. Recipe
Fill a spray bottle with 1/4 white vinegar and 3/4 hot water. I used an electric kettle to add hot water because the hotter the better to activate the adhesive in the wallpaper. Activation Time: 2 Minutes 
I sprayed two wallpaper panels with the DIY fabric softener wallpaper remover solution and waited for 2 minutes so the adhesive could activate. Be aware, that you’ll probably need to mix new fabric softener solution in the spray bottle frequently as you want to keep the water hot for optimal effectiveness. 
This method worked surprisingly well, but it did take a bit more effort than the store bought remover. And I did have to spray more wallpaper remover on the wallpaper a few times throughout the process as it seemed to try really fast. Still, it’s very inexpensive to make, and if you don’t have the store bought type, this is the next best thing. DIY Vinegar Wallpaper Stripper Pros:
Cons:
Once you’re finished, spray the wall with the solution one more time and wipe away any excess adhesive with a rag or sponge. 
That’s it! I’d been putting off this job for a while, but it really wasn’t bad at all. It’s almost therapeutic to get your frustrations out by ripping paper… almost, I said almost. ? I can’t wait to get started painting and adding the new wallpaper in this bedroom! It’s going to be so sweet!
Do I need to use wallpaper stripper on peel and stick wallpaper?
No, you only need to use a wallpaper stripper removal method on pasted types of wallpaper. Peel and stick should pull right away from the wall without problems. Wallpaper Ideas

The post The Best Way to Remove Wallpaper | 3 Methods Tried and Tested appeared first on Bless'er House. via Home Improvement Ideas for All Skill Levels https://www.blesserhouse.com/the-best-way-to-remove-wallpaper-3-methods-tried-and-tested/ This post is sponsored by Sunbelt Rentals. How to replace iron balusters and newel post for a DIY staircase makeover on a tight budget by using tool rentals to reduce project costs. Add this DIY project to the list of ones where we say, “Why didn’t we do this sooner?!” 
While there was really nothing wrong with our stair railing before, it just wasn’t our style. I’m sure someone at some point in our home’s history really enjoyed it. 
Is It Easy to Replace Staircase Spindles?The good news is you can replace just the spindles rather than replace the entire banister as an inexpensive way to get an updated look, and most staircase systems can be altered as an intermediate DIY project. I almost felt guilty for wanting to change the stair balusters in our foyer because I know so many people love that twisty basket wrought iron look. But they were just too intricate for my taste, and I wanted to change the the chipping, reddish gel stained wood handrail to a neutral color anyway to complement our mid-tone hardwood floors. When I mentioned it to Robert, he said, “I’m so glad you want to change that! I don’t like it either, but I didn’t want to say anything in case you liked it.” (Bless. I think I’ll keep this guy.) So a project was born. Tool Needed for Removing Iron BalustersWe needed a high performance reciprocating saw to handle the big job of slicing through our old wrought iron balusters, so we rented one from Sunbelt Rentals to fill the gap in our tool arsenal. 
If you have the right tools, replacing stair spindles (or balusters as the technical term) is a great project to do yourself and can save up to thousands of dollars instead of hiring out. Removing iron balusters just requires more power and patience than wood. Especially in a DIY project you’ll likely only do once, it’s more cost effective to rent the specialty tool you need from the thousands Sunbelt Rentals has available. It wasn’t easy to find much information online about how to replace iron balusters (only tutorials on how to replace wooden ones), but the rental equipment specialists were able to guide us to the correct method for the job. 
Metal Balusters vs Wood BalustersWe chose to replace our existing iron stair balusters with a different style of iron balusters, but you could also use this method to replace any type of existing balusters you have with wood balusters, if you prefer a more traditional style. There are so many staircase railing styles out there, and you can mix and match handrails, newel posts, and balusters to customize the look you want. The good news is if you have wood balusters or plan to replace metal balusters with wood balusters, wood is much easier to work with than metal because it’s easier to cut and easier to repair in case of a mishap. 
Replacing Balusters for a Simple DIY Stair MakeoverTools
Supplies
*It helps to have a partner help you with this project. 
Step 1 – Remove Old BalustersWe were honestly really intimidated to start removing the old balusters at first, but often the secret about DIY projects is facing your fear. Balusters are usually attached to a handrail and treads or a stringer with adhesive, epoxy, and/or screws. So inspect your old balusters to see how they are attached. Remove any screws or nails first with the drill or pliers. Ours were simply glued in. Place a piece of painters tape around each baluster. Number each one in order. This will give your saw blade some grip as it makes its initial cut while also allowing you to save your balusters to use as a measuring guide for cutting new balusters later. Starting at the painters tape, use a reciprocating saw (with a metal cutting blade for iron | wood cutting blade for wood) to cut the baluster in the middle. 
Have your partner hold the top of the baluster to reduce pressure on the handrail and prevent the wood from cracking. WARNING: Be sure to cut away from the direction of your partner and have your partner stand well behind the saw to prevent any contact with the blade. Once cut, each end of our balusters came out of the handrail and treads fairly easily with a gentle wiggling motion. For any stubborn ones, use pliers to break away the old adhesive. Replace your saw blade after cutting every 2-3 balusters. Dull blades create more friction putting more pressure on the handrail and increasing the chance of damage. Use the shop vacuum often to clean up any tiny metal shards leftover from cutting. 
Once cut and removed, set aside the old balusters and line them up in order so that you can use them as a reference for cutting your new balusters (this is where the numbered painters tape comes in handy). Tip: If you also plan to replace your newel post, only remove one or two balusters and then skip down to Step 4! This is important to maintain your handrail’s support. 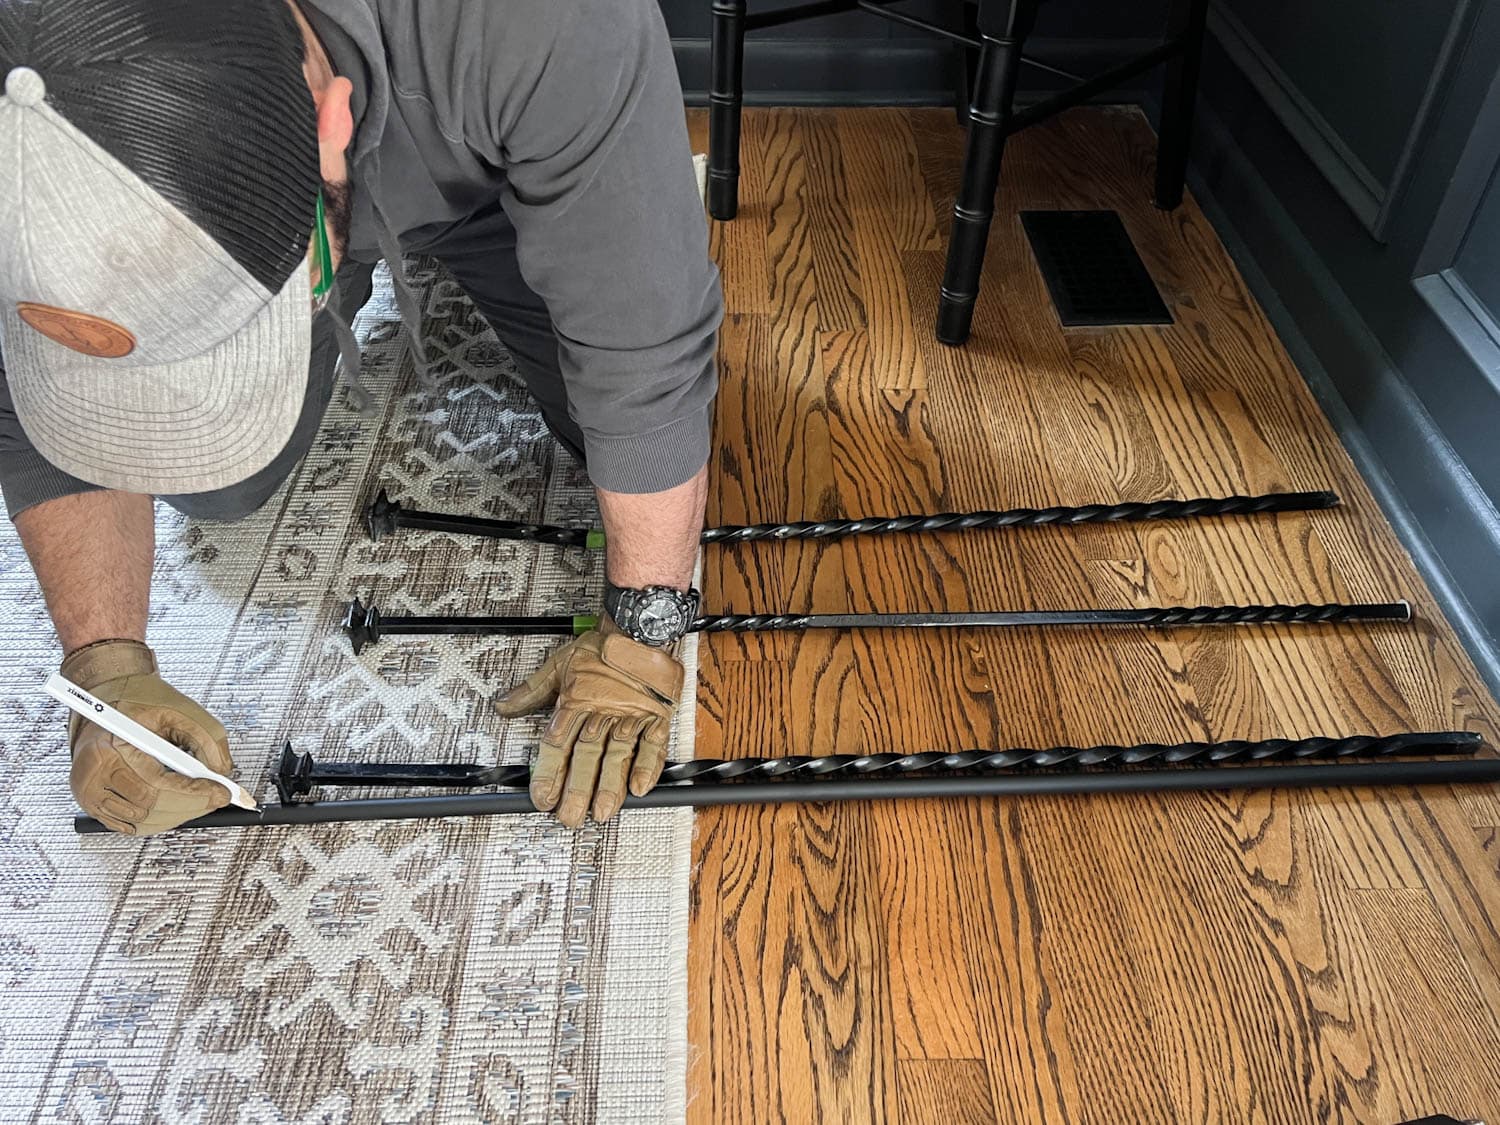
Step 2 – Clean Up Old Holes and Resize With the DrillTo keep things as easy as possible, it’s a good idea to reuse the same spacing and old holes leftover in the treads and handrail from the removed balusters with new balusters around the same size. Remove any old adhesive or epoxy from the old holes using a forstner drill bit the same size as the holes. A forstner bit is less likely to cause wood splinters in the hardwood treads and handrail to make a clean, smooth hole. If you have it in your toolbox, it’s a much better choice than a paddle bit for this step. Check to make sure the holes are large enough to fit your new balusters; drill your holes larger to fit as needed. If the holes are bigger than the balusters, the shoes can be used to conceal those later. 

Step 3 – Cut New BalustersUse your old balusters that you numbered and set aside in Step 1 as a reference to mark the measurements for your new balusters with a pencil. If your old balusters are not usable, measure the space between the top of the tread and the bottom of the handrail and add an inch. 
Use a miter saw or just a simple hack saw to cut through the new iron spindles. (If using wooden spindles, a regular hand saw will do.) We placed a couple of towels underneath the iron spindles so the black finish wouldn’t get scuffed on our sawhorses. 
Dry fit the new spindles to make sure they all fit on the stair railing, but remove them and set them aside for later. It’s easier to paint the handrail next without any spindles in the way. 
Step 4 – Attach a New Newel PostThis step won’t apply to every baluster replacement project, but because our stair railing’s newel post matched our old spindles with its ornate iron basket design, we had to replace the newel post as well. Our handrail’s design curls around the newel post, so we had to remove two spindles to get them out of the way so that we could access the newel post. Leaving most of the spindles intact for this step provided enough support under the handrail to allow us to replace the newel post. Cut and remove the newel post the same way as the balusters. Our old post was mounted on a wooden block screwed into the tread. After removing the iron post, we cut away the wooden cap and removed the screws from the block to reveal the post hole. 

On a new 4×4 wooden block, we used a speed square to mark an X and find the center of the block. Placing the new newel post in the center of the X, we traced it as a guide to drill a hole. 

We used a paddle bit to drill the newel post hole. Using a regular drill bit, we drilled 4 pilot holes halfway through the block. 
Once drilled, we set the new newel post into the block on the tread and into the handrail. To anchor the block to the tread, we drove 4 2-inch wood screws through the pilot holes. Then, we just filled the screw holes with wood filler and applied construction adhesive into the newel post holes in the block and handrail. (We waited to attach the last two spindles around the newel post until we could completely sand, prime, and paint the block so that we didn’t have to work around any obstacles.) 
Step 5 – Prime and PaintIt’s a lot faster and easier to prime and paint the handrail before replacing balusters. Lightly sand the surface to give it “tooth” and wipe away any dust with a tack cloth. 
Use a pro quality angled 2-inch paint brush to apply a coat of waterborne bonding primer. 
Once the primer is dry, sand it smooth with a fine grit to eliminate brush strokes. I like to use just simple sandpaper (not a sanding block) so that I can easily contour it into the curves and grooves of the handrail. Use a tack cloth to remove sanding dust. 
Then, apply two coats of a waterborne alkyd paint. (We used satin sheen – even though that photo above depicts semi-gloss because I decided last minute that satin worked better with the finish of our new balusters.) Waterborne alkyd paint is best for stair railings because it cures to a durable, hard surface that can withstand continuous traffic. It’s self-leveling so brushstrokes disappear as it dries to a smooth finish. 
Step 6 – Attach New BalustersAfter the paint is dry on the handrail (overnight is best), begin installing the new balusters. Slide a shoe onto a baluster and apply a some construction adhesive into the handrail hole and tread hole. Insert the end of the baluster into the handrail hole. There should be enough extra room in the handrail hole to push the baluster slightly upward so that the bottom end slides into place in the tread hole. 
Apply a little more construction adhesive into the handrail hole after the baluster is in place for extra security. We used some painters tape to protect the black metal spindles from any adhesive messes and removed the tape right after application. To secure the balusters to the treads, we set 3/4-inch self-drilling wood screws beside the iron spindles so they were snug in the holes. 

Then, we slid the shoes down over the tread holes for a clean look. We let the construction adhesive completely dry for at least 24 hours before touching up with paint. 
DIY Stair Makeover AfterCheck out that sleek new black stair railing! Well, it’s half new anyway. Our stairs are now the perfect blend of modern and traditional, which you know, if you’ve hung around here for a while, is exactly how we like it. I do think sometime later this year I’d like to add a runner to the steps. Those bare wooden stair treads are a little slippery and loud without one. Plus, it would be so pretty! I’ve toyed with the idea of painting the stair risers a different shade too. What do you think? 

Runner or not, I can’t get over the difference 6 years have made in our foyer and staircase. Never underestimate the power of paint and good old fashioned will power. Not to mention, that Facebook Marketplace console and our family gallery wall worked some magic too. 
How much does it cost to replace stair spindles?This project was so much more budget-friendly than hiring a contractor and absolutely DIY-able. Because we didn’t have to buy a higher powered saw to handle the wrought iron removal and could rent the necessary tool from Sunbelt Rentals instead, we managed to do this project for even less. The total cost of the tool rental, saw blades, primer, paint, adhesives, new balusters, newel post, and disposable materials was $383 total. Of course the longer your stair railing, the more expensive it will be. If you were to replace the handrail as well, that would increase the cost. 

So that’s it. The almost official before and after, with maybe only needing the addition of a stair runner… or a little ceiling treatment… maybe a real wool vintage rug eventually. Okay, you know what? There is never actually an official “after” because the journey is the best part. ? But that stair railing? It really is the after I’ve dreamed of for 6 years. More DIY Home Improvement Ideas
The post How to Replace Stair Spindles – DIY Stair Makeover appeared first on Bless'er House. via Home Improvement Ideas for All Skill Levels https://www.blesserhouse.com/how-to-replace-stair-spindles-diy-stair-makeover/ In the last few years, kitchen DIYs have gotten very popular. They don’t have to be over the top and they also don’t have to break your wallet. If you’re looking to add a cheap way to get some solid countertops then you’re reading the right blog. Check out my countertop plans and follow along! Table of Content:

Materials I Used to Build the Countertop
Step 1: Moving Material to the Shop and Cutting EdgesThe first thing I did was move my mobile cart to the side of my miter saw stand. This is so I can flip out the wing and pull material directly from the cart to the saw and cut the ends. Whenever you’re joining boards together you need all the edges and ends to be at a 90 and straight. The miter takes care of all the ends. It’s also at this step that you can cut your boards to length. I recommend taking the measurement your top needs to be then leaving yourself and extra 1” or 2. You will cut it down perfectly later on. 
Step 2: Rounding The Edges of the MaterialNext is to knock off the rounded edges of the material. If you have a jointer, then you can use it to get one edge flat…..and one face flat. Next I move the pretty large pile to my table saw. Here I make sure to place the jointed edge up against the tablesaw fence to get the second edge parallel. Then I use the thickness planer to get the second face flat. Now if you don’t have a jointer then I’ll leave you a link to two videos I’ve done where I show how to use a table saw or a router as a jointer. But you can definitely keep this project simple and let it be a little imperfect. If you only have a tablesaw, you can use it to cut off each rounded edge, then leave the face alone. This method will require more sanding and you might end up with a few small gaps, but you can still build yourself some countertops. 
Step 3: Creating the Countertop PatternOk after getting all the material square and straight, I next laid out my boards to get the depth my countertop and shelf needed then started rearranging them. The first thing I do is line up one side of the boards to be in line with one another. Now my finished countertop will land about here but it’s aways best to make a bigger than needed slab then cut it down in the end. Next I look at the tree ring direction and try to stagger them. See how these rings curve down? This one is pretty center but this one curves up, this one down, What you want you avoid is all the rings facing the same direction as that will promote the entire slab to cup in that direction whereas alternating them will oppose forces. The next thing I look at is where all the seams line up, see how most all land right in this zone? I want a little more variety so what you can do is take smaller boards and place them at the front. Just flip flop the two boards and that will push the seam away from the others. To where after I did that with a few other rows, now my seams were spaced out all across the slab. Ok then last thing I looked at before sticking things together, was the butt joints. You can see this joint doesn’t close nicely. If it doesn’t close nicely now, it definitely won’t one you put glue on it so take the time to re cut both ends here at the miter saw. 
Step 4: Assembling the CountertopOk now lets do the thing that I would bet causes the most stress in woodworking. I’m talking about glue up! It is common when you’re first starting to build to make a big slab like this and try to glue up all the boards at one time. However, you learn really quick that it’s way better to do multiple small glue ups so they come out right rather than rush it and mess it up or stress yourself out. When you’re glueing things together with yellow wood glue, my go to is DAPS Weldwood, you typically have about 3-4 mins of working time, which is not a lot. So have as many things ready to go as you can such as clamps, brushes, mallets, and bisquets in my case. Which lets talk about next. You can definitely cut all your boards and just glue then clamp them together but where bisquets help is with aligning the tops. Once you apply glue to two surfaces they will slip and slide and getting a perfectly flush top is almost impossible. By cutting in bisquets slots…. this tool references the top of each board to cut in a slot on each edge so that when you insert a biscuit, it will automatically align each board and not allow it to slip around while applying pressure. Alternatives that achieve the same thing are dowels or a domino but remember you can definitely just glue up the boards if you don’t have anything, it will just require more flattening in the next step. 
Step 5: Altering the Countertop Thickness (optional)Actually, I added in a step. See after milling my boards, my 2x4s turned out to be only 1 1/4” thick. Which is good but I personally wanted the look to be closer to 2”. To achieve this, I cut a nose that is the thickness I want and simply attached it to the very front. So know this is a trick you can use to make your glue up look thicker. 
Step 6: Thinning out the CountertopOk, now lets flattening this thing. Like everything in building, there are several ways to do everything. The countertop is too wide for my thickness planer so I just did this by hand with my 4” belt sander. You want to choose the widest belt sander you have so it’s easier to keep it flat and not create divots. I also like to turn my sander to a 45 in the first pass to hog away material faster, then I sand out the scuffs this creates in the lower grits. For my skinner matching shelf, I threw this through the drum sander and this makes quick work of it. 
Step 7: Cutting the Countertop to LengthI now cut my top and shelf to their exact needed length. I chose the sliding portion of my tablesaw to make sure this cut was at a perfect 90 but a track saw or circular saw with a fence would work as well. Next I wanted to set the countertop in place and see how it was going to look up against my wall. No wall is ever perfectly straight so expect to have some gaps on your install. You can cover up this gap with a backsplash board or you can trace the exact shape of your wall onto the countertop, this is called scribing. I did this with a washer but you can use just about anything. Once I had my line established I used my sander once again to take away material up to it. If you have a big gap you can always use something like a multi tool to cut away more material up front then refine it with a sander. 
Step 8: Applying FinishOk and that’s it for the technique building part, I now have a countertop ready to install but before doing that I finished it. I’m using Total Boat’s Gleam 2.0 which is a Spar Varnish that is super easy to use, a high gloss (exactly what I was going for here), and my favorite feature: it’s fast drying. I like to use their Wood Sealer varnish primer before hand which fills in the grain to create a smoother finish. Finishing Tip:Have you ever seen white washed items before? Well I wanted a slight grey tint so I did the same thing where you can take latex paint and dilute it with water to create a more translucent stain sort of finish, but I did it with grey. The more water you add, the more translucent it will be. I used a foam brush to wipe it on, then almost immediately wiped it off. After letting that dry I applied a clear coat to protect everything. Step 9: Installing the CountertopTo install the countertop I simply crawled inside and screwed through some wooden scrap strips I screwed into place…and you can see how taking the time to scribe the two edges really makes a difference. Then for the shelf up here I screwed a cleat to the corner where there is framing, then cut in a receiving notch so my shelf could sit on top and allow me something to screw down onto. The left terminates into the cabinets so I could go to the inside and go directly into the end grain. Annnnd I’m going to call that another project done. I’ll leave you links to the videos showing you how to build cabinets and also me installing these in case you’re interested. I hope this video has given you some good tips or inspiration if making cheap countertops is on your to do. 
Things I Used to Build The Cheap Countertop:via Wilker Do's https://wilkerdos.com/how-to-build-a-cheap-countertop-in-12-simple-steps/ |
Social Media:
Other Blogs: Kennesaw Garage Door Repair's Blog Tumblr Medium Other Profiles: Gravatar Diigo Evernote GetPocket OneNote IFTTT About.me Instapaper Disqus Nimbusweb.me Archives
April 2023
Categories |
 RSS Feed
