The highest form of bliss is living with a certain degree of folly.

|
How to make DIY built in bookshelves with glass front Oxberg doors using the budget-friendly IKEA Billy bookcase hack. 
Another IKEA Billy bookcase hack in the books! After our third set of these bad boys that we built in the home office makeover, Robert and I could probably make these built in bookshelves in our sleep at this point. But every time we’ve done one of these hacks, we’ve used a different size or type of Billy bookcase, and with out-of-stock issues popping up at IKEA lately, I thought it would help to make a tutorial for this specific skinny version with glass panel doors so you can adapt to availability. See our DIY built in entertainment center using tall, wide Billy bookcases here. Or see our DIY playroom built in bookshelves using short, wide Billy bookcases here. They all follow mostly the same steps, but we feel like we’ve officially mastered DIY built in bookshelves with this method. If you’re looking for a less expensive way to create a custom high-end look in your home, need lots of vertical storage without wasting space, or just want to try a great beginner-level carpentry project, this is the one! 
DIY Built In Bookshelves Using the IKEA Billy Bookcase HackTools
Supplies(This is what we used, but you can change the number of Billy bookcases and Oxberg doors to fit your wall’s dimensions or needs.)
Note: Consider the measurements of your wall and ceiling height to adjust the number of bookcases and board sizes you’ll need. For reference, our ceilings were 8′ and our wall was 11.5′ wide. The StepsStep 1 – Remove BaseboardTo get the Billy bookcases as flush as possible to the back wall, remove the baseboard. Use a utility knife to cut along the caulk lines of the baseboard. Then, use a claw back hammer and a small pry bar to pull the baseboard away from the wall. 
Step 2 – AssembleAssemble all of the boxes of the Billy bookcases, including the top extension. Leave the bookcases without the thin backing that comes with them since the back wall will become the bookcase backing since you’re building them in. You can keep the top extension off until after you anchor the bookcases to the wall. 
Step 3 – Correct GapSince the bookcases are designed to have a backing (but it’s best not to have one in a built-in to allow access to outlets), there will be a small bap at the back. To make this look seamless, measure the bookcase and cut a piece of 1×2 board. Attach the 1×2 to the back of the bottom of the bookcase with the finish nailer. And the gap is gone! Caulk will fill any cracks later. 


Step 4 – Anchor ShelvesMeasure your wall and make sure the bookcases are centered and place where you want them. Anchor the middle bookcase. 
Step 5 – Attach Each Billy Bookcase TogetherUse your clamps to tightly hold together the sides of two bookcases. Then, screw the wood screws through both sides of the bookcases to secure them to each other. 

Step 6 – Built In the GapsSee that little bit of space around the sides and top of the Billy bookcases? We want to fill that in to make the bookcases look like built ins. 
Step 7 – Attach 2x4sIn the small gaps, drill 2x4s to the wall and the side of the Billy bookcases. 
Do the same for the top of the shelving unit too. 
Step 8 – Attach 1×4 Boards to FaceTo make the bottom of the bookcases look like one solid built-in piece of cabinetry, attach 1×4 pre-primed boards with finishing nails. Use a coping saw or jigsaw to cut out the sides of the boards to mimic the shape of the baseboard on the wall. It doesn’t have to be perfect as caulk can later fix imperfect cuts. Repeat the process for the top of the Billy bookcases, coping the sides of the 1×4 boards to fit the crown molding. 


Step 9 – Cut 1×10 Boards to Fit SidesSince the sides of the bookcases typically aren’t the exact width of a board, measure the gap between the bookcase and the wall and cut down the 1×10 board to fit as the face on the sides using a circular saw or table saw. 
Step 10 – Attach 1×2 Boards to FrontUse the finish nailer again to attach 1×2 boards to the fronts of the bookcases to hide the cracks where the bookcases meet together. 
Doesn’t it look so flush and solid now?! Well, it will once the cracks are filled with caulk and gaps are filled with Loctite foam. 
Step 11 – Fill Gaps, Cracks, and Nail HolesUse Loctite foam to fill any larger gaps. We used it to fill the small gap between the bottom 1×4 and the bottom of the bookcases since it was slightly too big for caulk. Once dry, cut the foam and sand it smooth. Use caulk to fill any cracks between the wall and boards. Then, use wood filler to cover any nail holes or cracks in the boards where they meet. Let dry. 
Step 12 – Sand SmoothOnce all of the fillers are dry, use an orbital sander to smooth it out. 
Step 13 – Remove DustWe used our shop vac to remove any sanding dust from the built ins to make it ready for paint. 
Step 14 – Paint BoardsPaint all of the visible boards with the satin paint you had matched to the bookcases to make everything look like one solid piece of built in bookshelves. You don’t have to paint the Billy bookcases themselves, just the boards so they’ll match them. Not bad for using an IKEA hack, huh? 
Step 15 – Add Doors (optional)We wanted to add glass/panel Oxberg doors to the front of a few of the bookcases to provide some concealed storage. Oxberg doors are designed by IKEA to fit Billy bookcases, but by making these built in, there’s a trick to hang them properly. 
Step 16 – Mark on a Combination Square for 1×2 DepthSince the existing holes on the Billy bookcases are no longer useful for hanging Oxberg doors as they are intended in design, you have to make new holes to account for the depth of the 1×2 boards added to the front of the bookcases. Place a combination square against the 1×2 and mark its depth with painters tape. 
Step 17 – Mark the New HoleUse the marking on the combination square to mark new holes closer to the front of the bookcases. 


Step 18 – Mark the Hole Depth on a Drill Bit and Drill a New HolePlace your drill bit inside of an existing bookcase hole. Use tape to mark where the hole stops so you know how far to drill the new holes. Drill into where you marked for the new holes to that depth. 
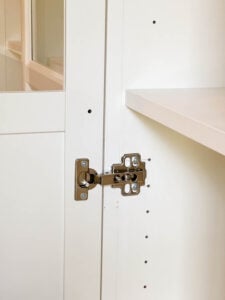
Step 19 – Attach Hinges and Door HardwareScrew the door hardware into the new holes you drilled, and attach hinges to the doors. 

Step 20 – Hang Doors and Add KnobsHang the Oxberg doors to the bookcases, and check to make sure all doors on the built in unit align properly. Then add pulls or knobs. 
Style the ShelvesHave fun filling up those bookcase shelves! I like to alternate stacking books and lining up books with decor mingled in. Play around with heights and shapes until you’re happy with the decor placement. Here are more tips for decorating shelves. 

That’s it! There’s one more IKEA Billy bookcase hack in the books! I didn’t originally intend on using these skinny shelves, but in the end, it definitely worked out! 
You can see the fully finished home office here with all of the paint colors and decor/furniture sources we used! More IKEA Hack Ideas
 DIY Built In Bookshelves Using the IKEA Billy Bookcase Hack
How to make DIY built in bookshelves with glass front Oxberg doors for concealed storage using the budget-friendly IKEA Billy bookcase hack for a high end look on a budget.
Servings 1 Built In Bookcase Wall
Cost $1,300.00
Equipment
Ingredients
InstructionsRemove Baseboard
Assemble Bookcases
Correct Gap
Anchor ShelvesAttach Each Billy Bookcase TogetherBuild In the GapsAttach 2x4sAttach 1×4 Boards to Face
Cut 1×10 Boards to Fit SidesAttach 1×2 Boards to FrontFill Gaps, Cracks, and Nail Holes
Remove DustPaint Boards
Add Doors (optional)Mark on a Combination Square for 1×2 Depth
Mark the New HoleMark the Hole Depth on a Drill Bit and Drill a New Hole
Attach Hinges and Door HardwareHave you made your own DIY built in bookshelves before? Or done any other awesome IKEA hack? If you haven’t, here’s fair warning that you’ll be hooked once you finish your first one. It really is like the best beginner carpentry project with training wheels. 
The post DIY Built In Bookshelves Using the IKEA Billy Bookcase Hack appeared first on Bless'er House. via Home Improvement Ideas for All Skill Levels https://www.blesserhouse.com/diy-built-in-bookshelves-using-the-ikea-billy-bookcase-hack/
0 Comments
Leave a Reply. |
Social Media:
Other Blogs: Kennesaw Garage Door Repair's Blog Tumblr Medium Other Profiles: Gravatar Diigo Evernote GetPocket OneNote IFTTT About.me Instapaper Disqus Nimbusweb.me Archives
April 2023
Categories |


 RSS Feed
